[우테코] 1주차 ApplicationTest의 코드분석
이전 글: 단위테스트란?
단위테스트란?
fladi.tistory.com
단위테스트를 해보기 위해 JUnit을 사용하려고 했는데, 이미 있는 테스트가 extends한 NsTest가 뭔지 궁금했다.
JUnit과 비슷한 테스트 라이브러리인 것 같았다. 그래서 NsTest코드를 분석하고 테스트에 사용해보고자 하였다.

import camp.nextstep.edu.missionutils.test.NsTest;- 임포트문을 보니 nextstep에서 미션을 위한 테스트 유틸인 것 같다.
- https://edu.nextstep.camp/ 라는 곳에 들어가보니 다음과 같은 사이트가 나왔다

nextstep은 우테코와 비슷한 교육기관이었다. 이를 통해 우테코에서만 사용하는 테스트 라이브러리인 것을 알 수 있었다.
1. 게임종료_후_재시작() 코드 분석
import static camp.nextstep.edu.missionutils.test.Assertions.assertRandomNumberInRangeTest;

...

@Test
void 게임종료_후_재시작() {
    assertRandomNumberInRangeTest(
            () -> {
                run("246", "135", "1", "597", "589", "2");
                assertThat(output()).contains("낫싱", "3스트라이크", "1볼 1스트라이크", "3스트라이크", "게임 종료");
            },
            1, 3, 5, 5, 8, 9
    );
}- 여기서는 assertRandomNumberInRangeTest를 호출하며 여러가지 인자를 넣는다
- assertRandomNumberInRangeTest는 Assertions의 assertRandomNumberInRangeTest를 static임포트한 것이다.
- RandomNumberInRange, 범위내의 랜덤넘버에 대한 테스트인 것 같았다
<assertRandomNumberInRangeTest>
- 이 메서드의 첫 번째 인자는 Executable 인터페이스의 구현체이다. void execute() 메서드를 필수로 구현해야한다
- 이를 위해 익명클래스로 execute를 구현하였다. 내부에서는 run메서드를 호출하고, assertThat메서드를 호출한다.
- 나머지 인자에는 int값 하나 이상을 넣을 수 있다
Assertions.assertRandomNumberInRangeTest(...)
import static org.mockito.ArgumentMatchers.anyInt;

...

public static void assertRandomNumberInRangeTest(
    final Executable executable,
    final Integer value,
    final Integer... values
) {
    assertRandomTest(
        () -> Randoms.pickNumberInRange(anyInt(), anyInt()),
        executable,
        value,
        values
    );
}- Exeutable을 상속받은 객체와 int value를 한 개 이상 받는다
- Integer... values 는 가변인자로, 0개 이상의 값을 받을 수 있다
- 이 메서드에서는 assertRandomTest를 호출한다
- assertRandomTest의 첫 번째 인자는 Verifiation이라는 인터페이스를 상속하는 구현체이다
- Verification을 상속받기 위해서는 void apply()라는 하나의 메서드를 구현해야한다
- 여기서는 apply()메서드를 화살표함수로 구현하여 익명클래스를 만들었다
- apply() 내부에서는 Randoms. pickNumberInRange 를 실행하도록 한다. 범위 내에서 랜덤한 int값을 뽑는 것 같다
Assertions.assertRandomTest(...)
import static org.junit.jupiter.api.Assertions.assertTimeoutPreemptively;
...

public class Assertions {
    private static final Duration RANDOM_TEST_TIMEOUT = Duration.ofSeconds(10L);
    ...
    private static <T> void assertRandomTest(
        final Verification verification,
        final Executable executable,
        final T value,
        final T... values
    ) {
        assertTimeoutPreemptively(RANDOM_TEST_TIMEOUT, () -> {
            try (final MockedStatic<Randoms> mock = mockStatic(Randoms.class)) {
                mock.when(verification).thenReturn(value, Arrays.stream(values).toArray());
                executable.execute();
            }
        });
    }
}- Verification인터페이스의 구현체와, Executable인터페이스 구현체, 그리고 T값 여러 개를 받는다
- T라고 써진 걸 보니 int값이 아니라 Long, Double 이런 값도 받을 수 있는 것 같다
- 여기선 assertTimeoutPreemptively 를 호출한다.
- 이 메서드는 JUnit메서드이고, Duration 객체와 Executable을 상속한 클래스 객체를 받는다
- 주어진 시간제한이 초과되기 전에 제공된 실행 파일의 실행이 완료되는지 확인한다
- Duration 객체를 통해 테스트가 진행되어야하는 시간을 주고, 실행할 코드를 준다
- 실행할 Execute 코드에서는 mock으로 가짜객체를 만든다. (Randoms에 대한 가짜객체)
- Randoms의 가짜객체 mock은 verification을 실행했을 때 -> value와 values를 배열로 만든 걸 return한다
- 가짜객체의 메서드를 호출했을 때 정해진 값이 나오도록 함
- Randoms. pickNumberInRange를 실행 -> value가 나오는 걸로 정함
- 그리고 executable.execute() 로 실행한다.
- 실행할 코드를 실행
- run("246", "135", "1", ...) 실행,
- assertThat(output()).contains("낫싱", ...) 실행
- 실행할 코드를 실행
- +) try에 catch가 없는 이유
- try(final MockedStatic<Randoms? mock = mockStatic(Randoms.class)) { ... }
- 이런 꼴의 try문은 catch를 위한 게 아니라, 1개 이상의 자원을 선언한 try문이다(try-with-resources Statement, try 리소스 문이라고 부른다)
- 이는 try 블록의 statement의 끝에서 선언된 리소스들이 닫힌다는 걸 보장한다.
- 그래서 선언된 mock객체는 try의 내부에서만 사용할 수 있다
import static camp.nextstep.edu.missionutils.test.Assertions.assertRandomNumberInRangeTest;

...

@Test
void 게임종료_후_재시작() {
    assertRandomNumberInRangeTest(
            () -> {
                run("246", "135", "1", "597", "589", "2");
                assertThat(output()).contains("낫싱", "3스트라이크", "1볼 1스트라이크", "3스트라이크", "게임 종료");
            },
            1, 3, 5, 5, 8, 9
    );
}
다시 원래 코드로 돌아오니 무슨 테스트코드인지 조금은 이해가 된다.
- Randoms mock객체를 주입받은 후 실행할 코드를 첫 번째 인자로 넘겨준다
- Randoms.pickNumberInRange를 실행했을 때 나와야하는 결과 int값을 1개 이상 넣는다
이제 run은 무엇이고, assertThat은 무엇인지 보자!
NsTest.run()
protected final void run(final String... args) {
    try {
        command(args);
        runMain();
    } finally {
        Console.close();
    }
}

private void command(final String... args) {
    final byte[] buf = String.join("\n", args).getBytes();
    System.setIn(new ByteArrayInputStream(buf));
}

protected abstract void runMain();- command함수에서는 args(여러 인자)들을 받아 Console의 입력값으로 넣는다.
- runMain()으로 Main함수를 실행한다는 것 같다.
- 이번에도 try에 catch문이 없다
- 예외처리할 생각은 없고, 예외가 발생하든 안하던 Console은 닫겠다는 느낌인 것 같다
- run함수를 요약하면 입력값을 console의 입력값으로 세팅한 후, Main함수를 실행한다는 것이다.
Assertions.assertThat
/**
* Creates a new instance of StringAssert from a String.
*
* @param actual the actual value.
* @return the created assertion object.
*/
public static AbstractStringAssert<?> assertThat(String actual) {
return AssertionsForClassTypes.assertThat(actual);
}- 문자열을 받아 StringAssert객체를 만들어 반환한다고 한다
- assertion 객체를 만든다고 함
- NsTest의 output을 받아 StringAssert객체를 만든다는데, output()은 다음과 같음
NsTest.output()
private PrintStream standardOut;
private OutputStream captor;

@BeforeEach
protected final void init() {
    standardOut = System.out;
    captor = new ByteArrayOutputStream();
    System.setOut(new PrintStream(captor));
}

@AfterEach
protected final void printOutput() {
    System.setOut(standardOut);
    System.out.println(output());
}

protected final String output() {
    return captor.toString().trim();
}- @BeforeEach
- standardOut에 System.out을 세팅
- capor에는 ByteArrayOutputStream 객체를 만들어 넣는다
- System.setOut 세팅으로 PrintStream 객체를 넣는다
- captor를 toString으로 만들어 앞 뒤 공백을 자른 걸 return하면
- @AfterEach
- standardOut(System.out)을 System.setOut으로 설정해주고
- Syetem.out 으로 해당 글자를 출력한다
- 요약해보면 output()은 system.out으로 print될 애들을 return 하는 것 같다
import static camp.nextstep.edu.missionutils.test.Assertions.assertRandomNumberInRangeTest;

...

@Test
void 게임종료_후_재시작() {
    assertRandomNumberInRangeTest(
            () -> {
                run("246", "135", "1", "597", "589", "2");
                assertThat(output()).contains("낫싱", "3스트라이크", "1볼 1스트라이크", "3스트라이크", "게임 종료");
            },
            1, 3, 5, 5, 8, 9
    );
}- assertThat은 system.out으로 출력될 애들을 StringAssert객체로 만든다고 한다
- contains메서드
- AbstractCharSequenceAssert의 메서드이다
- 실제 CharSequence에 지정된 값이 모두 포함되어 있는지 확인한다
- 만약 포함되어있지 않다면 AssertionError를 throw 한다고 한다.
- run과 contains 개수가 다른 이유
- 각각 입력에 대한 출력이 아니라, 전체 출력이 해당 문자열들을 포함하고 있는지 확인하는 것 같기도 하다
- 1일 때 "숫자를 입력해주세요: " 라는 출력이 나와서 띄어쓰기나 줄바꿈 기준은 아닌 것 같다
- 만약 전체로 비교하는 게 맞다면 3스트라이크가 왜 2번 적혔을까? 프로그래머는 중복을 싫어한다고 했는데..
- 어떻게 5개인지 잘 모르겠다. 공부가 더 필요할 것 같다
최종정리
import static camp.nextstep.edu.missionutils.test.Assertions.assertRandomNumberInRangeTest;

...

@Test
void 게임종료_후_재시작() {
    assertRandomNumberInRangeTest(
            () -> {
                run("246", "135", "1", "597", "589", "2");
                assertThat(output()).contains("낫싱", "3스트라이크", "1볼 1스트라이크", "3스트라이크", "게임 종료");
            },
            1, 3, 5, 5, 8, 9
    );
}- 첫 인자는 Randoms 에 대한 mock객체를 만들었을 때 수행할 동작
- Randoms.pickNumberInRange 동작에 대해 mock객체가 반환해야하는 결과값을 1, 3, 5, 5, 8, 9로 설정한다
- 랜덤한 값 3개를 뽑으면 135, 589가 나오게 된다
- run으로 console의 입력값을 "246\n135\n1\n597 ..." 로 설정하고 Main함수를 실행한다
- system.out의 출력값이 각각 "낫싱", "3스트라이크", ... 를 포함하고 있는지 확인하고, 포함하지 않았으면 AssertionError를 throw한다.
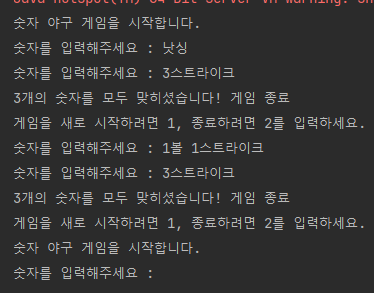
- 246 -> 낫싱
- 135 -> 3스트라이크
- 1
- 597 -> 1볼 1스트라이크
- 589 -> 3스트라이크
2. 예외_테스트() 코드 분석
@Test
void 예외_테스트() {
    assertSimpleTest(() ->
            assertThatThrownBy(() -> runException("1234"))
                    .isInstanceOf(IllegalArgumentException.class)
    );
}- 여기서는 assertSimpleTest를 호출한다
- assertSimpleTest는 Executable 인터페이스를 구현한 클래스의 객체를 첫 번째 인자로 받는다
- 여기서는 화살표함수를 이용하여 Executable의 한 개 있는 execute() 메서드를 구현하였다.
- asseetSimpleTest는 1초가 초과되기 전에 제공된 Executable인터페이스 구현 객체의 execute()의 실행이 완료되는지 확인하는 동작을 한다
- assertThatThrownBy는 ThrowingCallable 객체를 받음 (그냥 실행코드를 람다식으로 구현한다고 생각하면 된다)
- 실행코드를 받아 해당 코드를 실행했을 때 예외가 발생하는지 확인한다
- instanceOf로 발생한 예외의 타입이 IllegalArgumentException 타입인지 확인한다
- assertThatThrownBy의 자세한 설명은 다음과 같다
Throwable을 캡처한 다음 assert한다(람다를 사용하면 더 쉽게 수행 가능).
Java 8 예시:
@Test
public void testException() {
assertThatThrownBy(() -> { throw new Exception("boom!"); }).isInstanceOf(Exception.class)
.hasMessageContaining("boom");
}
제공된 ThrowableAssert.ThrowingCallable이 예외를 발생시키지 않으면 오류가 즉시 발생하며, 이 경우 as(String, Object...)와 함께 제공된 테스트 설명이 적용되지 않습니다. 테스트 설명을 사용하려면 아래와 같이 catchThrowable(ThrowableAssert.ThrowingCallable)을 사용하십시오.
// 어설션은 실패하지만 "display me"는 오류에 표시되지 않습니다.
assertThatThrownBy(() -> {}).as("display me")
.isInstanceOf(Exception.class);
// 어설션이 실패하고 오류에 "display me"가 표시됩니다.
Throwable thrown = catchThrowable(() -> {});
assertThat(thrown).as("display me")
.isInstanceOf(Exception.class);
또는 as(String, Object...)와 함께 제공되는 테스트 설명에 대해 assertThatCode (ThrowingCallable)를 사용하여 항상 적용할 수도 있습니다.
매개변수: shouldRaiseThrowable – 던질 수 있는 항목을 발생시켜야 하는 코드가 포함된 ThrowableAssert.ThrowingCallable 또는 람다입니다.
반환: 생성된 ThrowableAssert.
Assertions.assertSimpleTest(final Executable executable)
private static final Duration SIMPLE_TEST_TIMEOUT = Duration.ofSeconds(1L);
private static final Duration RANDOM_TEST_TIMEOUT = Duration.ofSeconds(10L);

public static void assertSimpleTest(final Executable executable) {
    assertTimeoutPreemptively(SIMPLE_TEST_TIMEOUT, executable);
}- assertTimeoutPreemptively를 호출한다
- assertTimeoutPreemptively는 제한시간 내에 executable의 실행코드를 수행할 수 있는지 테스트한다
- 자세한 설명은 다음과 같다
- 주어진 시간 제한이 초과되기 전에 제공된 실행 파일의 실행이 완료되는지 확인합니다.
참고: 실행 파일은 호출 코드와 다른 스레드에서 실행됩니다. 또한 시간 초과가 초과되면 실행 파일 실행이 사전에 중단됩니다. 가능한 바람직하지 않은 부작용에 대한 논의는 클래스 수준 Javadoc의 선점형 시간 초과 섹션을 참조하세요.
- 1초 안에 executable의 execute()가 실행되는지 확인한다
최종정리
@Test
void 예외_테스트() {
    assertSimpleTest(() ->
            assertThatThrownBy(() -> runException("1234"))
                    .isInstanceOf(IllegalArgumentException.class)
    );
}- runException("1234")를 실행했을 때 예외가 발생하는지 테스트함
- 그리고 발생한 예외의 타입이 IllegalArgumentException인지도 확인함
직접 뜯어본 경험은 처음이라 재미있었다
참고한 블로그
https://blog.naver.com/PostView.nhn?isHttpsRedirect=true&blogId=sseyoung513&logNo=221082287596
[기초 정리] Java - try(){ } , try-with-resources Statement, try 문과 비교
0. 정의1개 이상의 자원(resource, 리소스)을 선언한 try 문으로, try-with-resources Statement(try...
blog.naver.com
- try에 catch도 없고 try(){} 꼴로 선언하는 걸 처음봐서 구글링해봤다